
Integrate Github Action with a local network testing lab
One of the most important tasks in software development is Testing. And if we think that network automation and network programmability is also a kind of software development, we also need Network Testing.
With a solid Network Testing platform we can test ansible code, roles, python code, netconf/restconf, yang models, etc. Of course we can also test classic CLI and setup MPLS/EVPN/etc labs manually. In short, a network testing lab is important.
One key outcome that we can get with a network testing platform is iterability. With iterability we test as many times as we need in a very easy and automatic way: we can test an impletentation, check whether it works or not, if it doesn’t work we launch another test lab, and test again. This iteration loop is very important in any software development process.
This blog entry will show one example to deploy a local network lab, using docker, running in your own laptop/pc/server, and integrating this local lab with your CI/CD server, in this case Github and Github Actions.
Local Network Testing Lab based on Docker
You might already know the vrnetlab project, which is a wonderful project created by Kristian Larsson. Thanks to Kristian’s work, we can easily launch different routers and from different vendors (Cisco, Juniper, Arista, Nokia, etc) as docker containers, all of them running in your own laptop/pc/home server.
How vrnetlab works
I’m not going to enter into too much detail on how vrnetlab works (let me recommend you to read vrnetlab official docs), but I’d like to highlight some concepts:
- Vendor router images: you must get the official vendor images first. For example, if you want to test Cisco CSR1000v, then get the official image from Cisco.
- The docker containers actually run a single process: QEMU. Most of the virtual router images support KVM/QEMU (you must download this type of image version), and the docker container will just launch the qemu process.
- Each Dockerfile defines an ENTRYPOINT which usually references a python script called launch.py. This Python script defines different qemu options depending on the stage (docker container creation, docker run).
- After launching every container with
docker runcommand, there two important commands to run:
1) Command docker inspect <container_name> : this command will display a lot of information regarding this container. You need to identify the Networks section:
	"Networks": {
             "bridge": {
		        "IPAMConfig": null,
		        "Links": null,
		        "Aliases": null,
		        "NetworkID": "9f41d99c4a157ef6110ac4e651dd976bf99dd7d005c876f9c74f4aede2c63bc2",
		        "EndpointID": "da217c26dbcc6448c88bbba279498729901864520febf1a7507815e691a1c0e5",
		        "Gateway": "172.17.0.1",
		        "IPAddress": "172.17.0.2",
		        "IPPrefixLen": 16,
		        "IPv6Gateway": "",
		        "GlobalIPv6Address": "",
		        "GlobalIPv6PrefixLen": 0,
		        "MacAddress": "02:42:ac:11:00:02",
		        "DriverOpts": null
		    }
		}
Notice the "IPAddress": "172.17.0.2" field. This is the IP to ssh into.
2) Command ssh vrnetlab@<IP address> : In this case this command would be ssh vrnetlab@172.17.0.2.
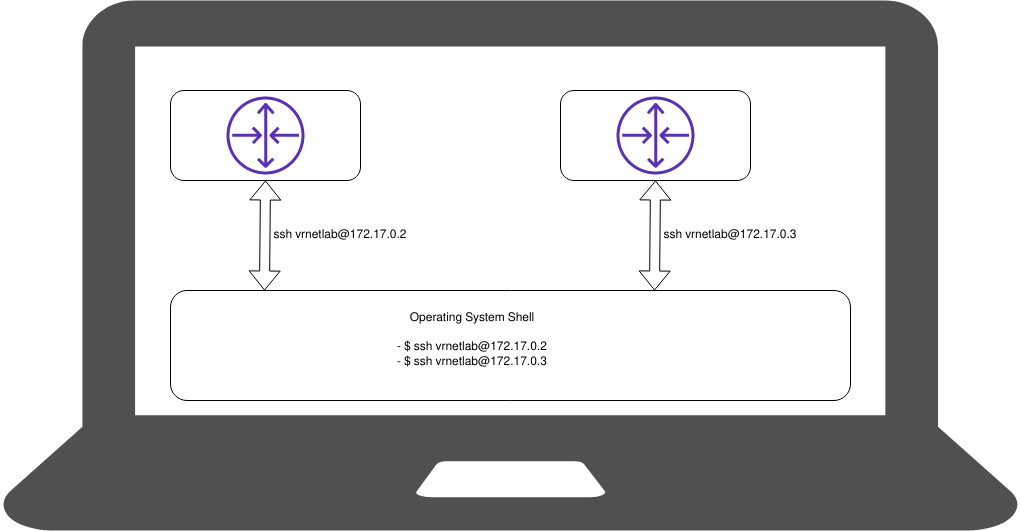
Local vrnetlab deployment
So, after some very basic information regarding vrnetlab and how it will work, we’re going to deploy our first home lab. This is a simple diagram:
The commands to deploy two Cisco CSR1000v routers would be:
$ docker run -d --privileged --name my-csr-router-1 vr-csr:16.12.03
$ docker run -d --privileged --name my-csr-router-2 vr-csr:16.12.03
You can check how docker launches two routers with docker ps command:
$ docker ps
CONTAINER ID        IMAGE             COMMAND             CREATED             STATUS                       PORTS                                                                  NAMES
4e0e545c6c63        vr-csr:16.12.03   "/launch.py"        About an hour ago   Up About an hour (healthy)   22/tcp, 80/tcp, 443/tcp, 830/tcp, 5000/tcp, 10000-10099/tcp, 161/udp   my-csr-router-2
2c266e6d2253        vr-csr:16.12.03   "/launch.py"        2 hours ago         Up 2 hours (healthy)         22/tcp, 80/tcp, 443/tcp, 830/tcp, 5000/tcp, 10000-10099/tcp, 161/udp   my-csr-router-1
And after a while, your new routers will be ready to use from your local shell, you could enter into your containers with these commands:
$ ssh vrnetlab@172.17.0.2
$ ssh vrnetlab@172.17.0.3
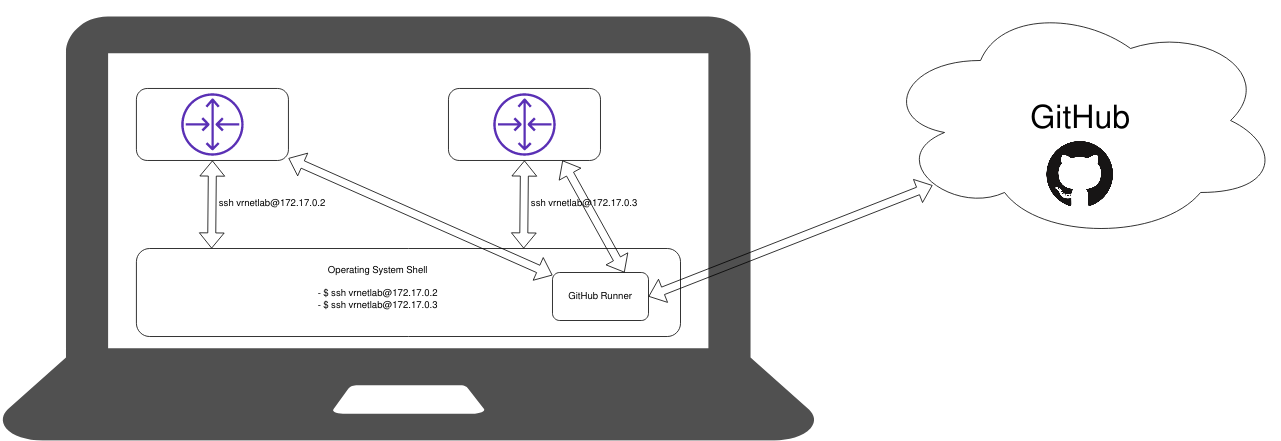
So, at this point we have a simple local lab with two Cisco csr1000v routers running. Now, let’s move forward and discuss how we can integrate this local lab with a Github Action, in order to run some code/test/whatever.
GitHub Action in your local machine
In order to show you how to integrate your local lab platform (in this case based on vrnetlan) let’s use this simple repo I did create in Github: https://github.com/javcasalc/hello-github-actions/tree/demo/local-vrnetlab .
GitHub Action definition
In order to have your GitHub Action, you need to define a workflow file in .github/workflow/ subdirectory. For example in this repo we have:
└─> $ ls -l .github/workflows/
total 1
-rw-r--r--   1 castillo       castillo 667 2020-11-10 15:43 main.yml
and if we check this main.yml file we will see all the magic here:
name: CI
on: [push, pull_request]

jobs:
  build:
    runs-on: self-hosted
    steps:
      - uses: actions/checkout@v2

      - name: Run playbook
        uses: dawidd6/action-ansible-playbook@v2
        with:
          playbook: vrnetlab.yml
          directory: ./
          inventory: |
            [all]
            csr1 ansible_host="172.17.0.2" ansible_ssh_user="cisco" ansible_ssh_pass="cisco" ansible_connection="network_cli" ansible_network_os="ios"
            csr2 ansible_host="172.17.0.3" ansible_ssh_user="cisco" ansible_ssh_pass="cisco" ansible_connection="network_cli" ansible_network_os="ios"

          options: |
            --verbose
Let’s check this file with more detail:
- There is a workflow name, and also we define in which git branches/actions will this workflow run:
name: CI on: [push, pull_request] - Important point: we tell to GitHub that this workflow must run in our local environment. Later we will install a Self-Hosted GitHub runner in our local PC/laptop:
runs-on: self-hosted - To test a simple Ansible Playbook, we make use of the Pre-defined Action available for everyone in the GitHub Action Marketplace: dawidd6/action-ansible-playbook@v2. Notice that we can define very easily:
- A playbook file
- An inventory file with our docker containers’s IP addresses.
      - name: Run playbook
        uses: dawidd6/action-ansible-playbook@v2
        with:
          playbook: vrnetlab.yml
          directory: ./
          inventory: |
            [all]
            csr1 ansible_host="172.17.0.2" ansible_ssh_user="cisco" ansible_ssh_pass="cisco" ansible_connection="network_cli" ansible_network_os="ios"
            csr2 ansible_host="172.17.0.3" ansible_ssh_user="cisco" ansible_ssh_pass="cisco" ansible_connection="network_cli" ansible_network_os="ios"

          options: |
            --verbose
Ansible brief explanation of playbook and inventory files
Before enter into the Self-Hosted runner section, let’s check very quickly what the ansible files look like:
vrnetlab.ymlplaybook file:
This file just defines some simple tasks to be executed in our lab routers. In this case, as we have deployed two Cisco csr1000v routers, a classic “show version” will be more than enough:
---
- name: Simple GitHub Action playbook
  hosts: all
  tasks:
    - name: playbook task1
      ios_command:
        commands: show version
- Inventory definition:
As we did see in previous sections, we have two docker containers running:
$ docker ps
CONTAINER ID        IMAGE                      COMMAND             CREATED             STATUS                    PORTS                                                                  NAMES
da1ece368124        vrnetlab/vr-csr:16.12.03   "/launch.py"        56 minutes ago      Up 56 minutes (healthy)   22/tcp, 80/tcp, 443/tcp, 830/tcp, 5000/tcp, 10000-10099/tcp, 161/udp   my-csr-router-2
a208efa4e983        vrnetlab/vr-csr:16.12.03   "/launch.py"        56 minutes ago      Up 56 minutes (healthy)   22/tcp, 80/tcp, 443/tcp, 830/tcp, 5000/tcp, 10000-10099/tcp, 161/udp   my-csr-router-1
And we can check their management IP addresses very easily:
$ docker inspect --format '' my-csr-router-1
172.17.0.2

$ docker inspect --format '' my-csr-router-3
172.17.0.3
So we have our routers with those IP. A simple inventory file for these routers would look like this:
csr1 ansible_host="172.17.0.2" ansible_ssh_user="cisco" ansible_ssh_pass="cisco" ansible_connection="network_cli" ansible_network_os="ios"
csr2 ansible_host="172.17.0.3" ansible_ssh_user="cisco" ansible_ssh_pass="cisco" ansible_connection="network_cli" ansible_network_os="ios"
Notice:
- I did create an admin user (privilege 15): cisco/cisco.
- We make use of ansible network_cli connection type.
- We let ansible know that these are “ios” devices.
Self-Hosted GitHub Runner
This is the last step before we get our lab fully complete.
Self-hosted runners offer more control of hardware, operating system, and software tools than GitHub-hosted runners provided. Your runner machine connects to GitHub using the GitHub Actions self-hosted runner application.
The runner is just a simple program written in .NET (even Linux version) which is open source (you can check its source code here: https://github.com/actions/runner), and runs in your local machine as another regular user program. It will have access to all libraries, binaries and tools installed in your machine.
For example: if your code needs to run Ansible, then your machine should have installed Ansible, so the runner can use it.
These are the steps you must follow in order to link a local runner with your GitHub repository:
-
Enter your repository
Settingsand in theActionstab, selectAdd self-hosted runner: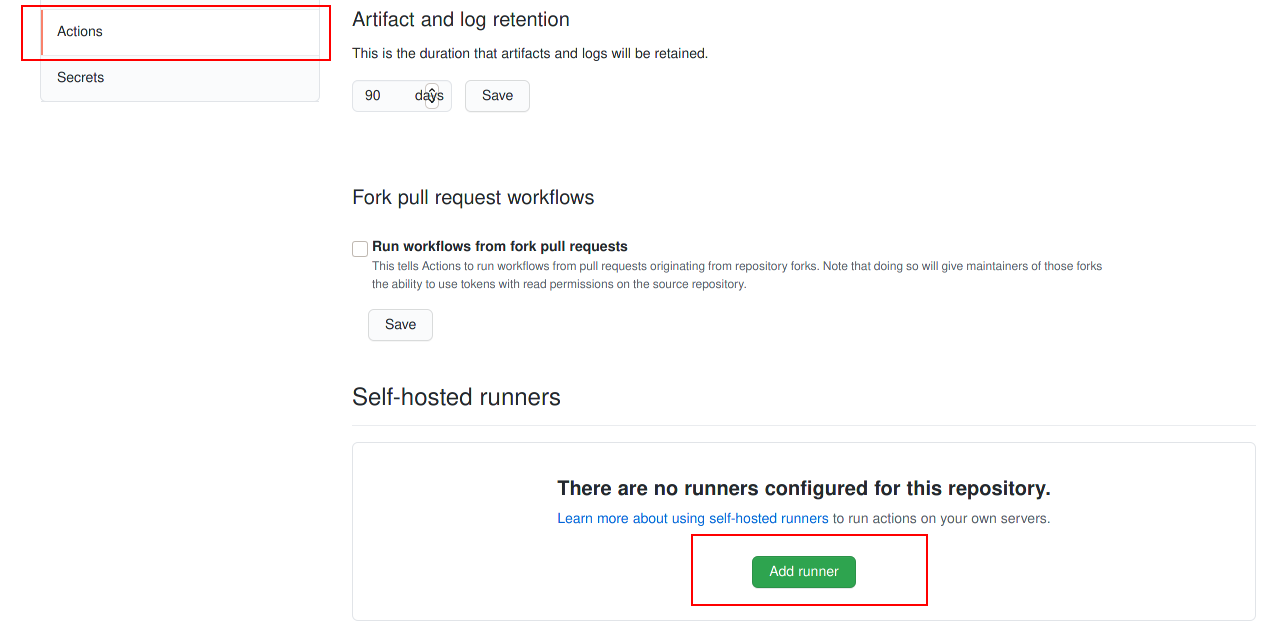
-
Next, follow the instructions, which are pretty simple:
1) Download Runner
$ mkdir actions-runner && cd actions-runner
$ curl -O -L https://github.com/actions/runner/releases/download/v2.274.1/actions-runner-linux-x64-2.274.1.tar.gz
$ tar xzf ./actions-runner-linux-x64-2.274.1.tar.gz
2) Config Runner
$ ./config.sh --url https://github.com/javcasalc/hello-github-actions --token <repo_token>
3) Execute Runner:
$ ./run.sh
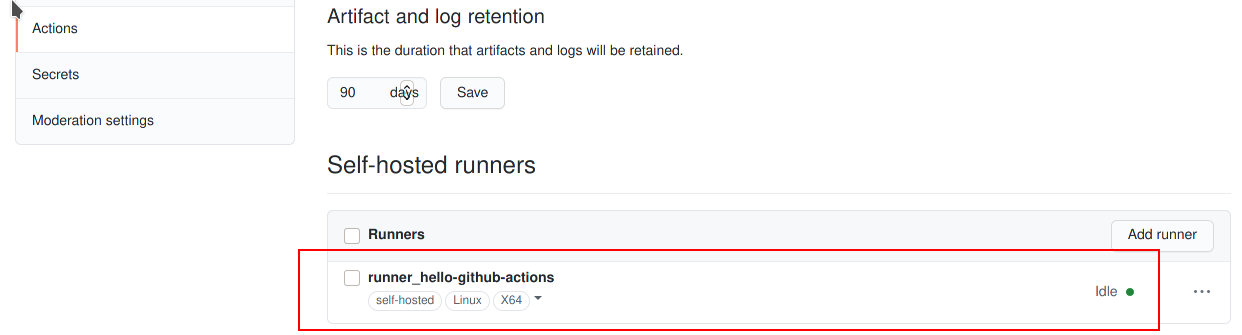
If everything works as expected you should see some messages like these:
$ ./run.sh

√ Connected to GitHub

2020-11-11 14:45:42Z: Listening for Jobs
In the Settings -> Actions repository option you should see your runner listed and ready:
GitHub Action Execution
So, now we have everything ready to test the lab environment: the routers, the github repository and action workflow, and the Runner in the local laptop. As soon as we have a push/commit, we could see how the Action goes on, in this case:
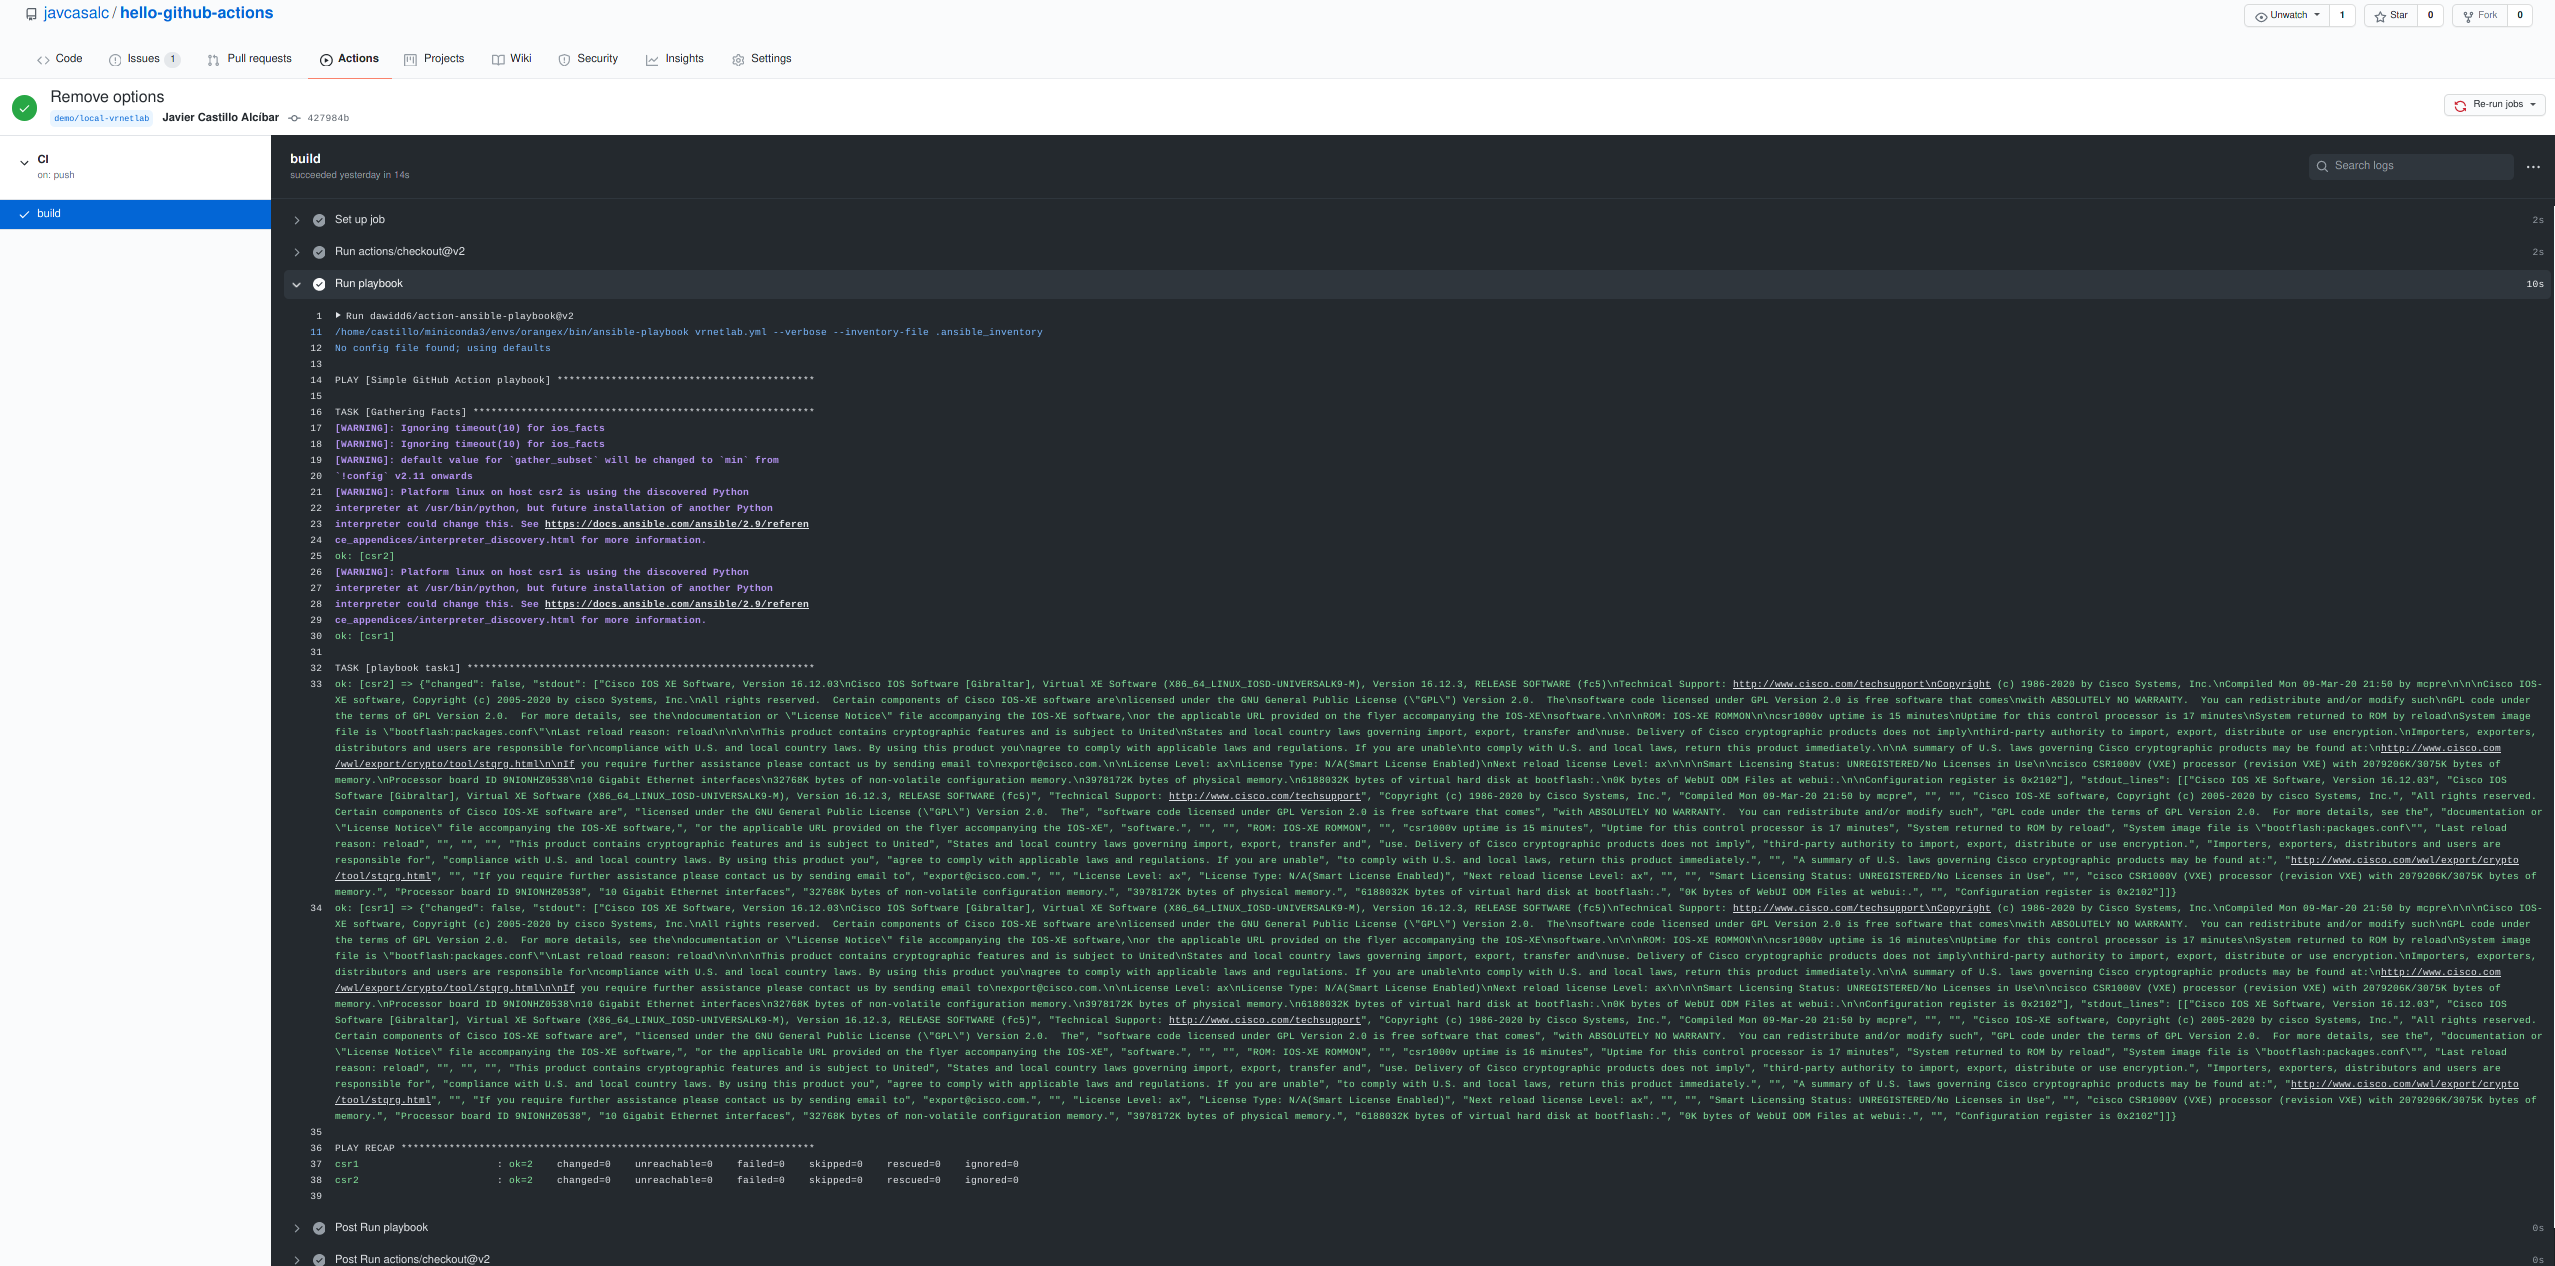
As you can see in the screenshot, the simple "show version" ansible task was executed successfully in both router
Recap and Summary
OK, so far so good, let’s summarize the steps we did follow in this blog post:
- We did setup a simple local lab using vrnetlab and docker, with two routers running locally.
- We did create a simple Github repo, with a simple GitHub Action, based on Ansible.
- We did install a GitHub runner in the local machine, and we did link this runner with the GitHub Action.
- We did push a commit to the GiiHub repo, and GitHub launched the Action, in this case, a “show version” was executed with an Ansible Playbook
So, with a decent local machine pc/laptop, you can run your own network lab environment, and use it from CI/CD platforms like GitHub or Gitlab, and test your code very easily.
In the next posts, I will make use of this environment to talk about Test Driven Development in the NetDevOps field.
Stay tuned.